8/10/2019 Several months ago I purchased a GoPro Hero 7 Black, primarily for the image stabilization that was said to be quite good. I mount my cameras out on the wing tip where it is subject to not only airframe vibration but aerodynamic buffeting as well. As a result, I usually get quite a lot of camera shake and jelly-roll.
After trying many different cameras and many different mounts trying to get it mounted securely enough so as to eliminate the camera movement I failed to find a solution that provided video quality I was truly happy with. I tried various quality and frame rate settings and anything else I could think of without much in the way of success.
When the GoPro Hero 5 came out and I read about image stabilization it bought one to give it a try. The image stabilization may have worked well for other purposes, but for mounting on an airplane it did virtually nothing. I eventually sold that camera to a friend.
Last year I heard about the Hero 7 that had image stabilization that was supposed to be a huge improvement over the previous version. Others had tried it on airplanes and said it worked very well. I took the plunge and bought one.
I was very pleased with the image quality. Set for 1080p at 60 fps it delivers very crisp, clear video with little to no camera shake. Bingo, a camera that finally works really well and delivers results that I am actually satisfied with. Unfortunately, it has one, rather sizable flaw. Battery life, or more precisely, lack thereof. Most of the time it will only record for a little over an hour, sometimes as much as an hour an twenty minutes, before the battery dies and it shuts off. Since most of my flight legs are longer than that it was very frustrating that I couldn't get a full leg recorded, even though I put a fresh battery in at each stop.
I had pretty much given up when I heard about the new power supply from FlightFlix that was designed to get power from the position lights and let you run a camera off ships power. Awesome, just what I was looking for. I ordered one and set out to figure out how to install it.
The power supply can be found at FlightFlix, here: https://flightflix.net/product/aircraft-camera-power-supply/.
The main drawback is that there had to be some provision for getting a cable from the power supply to the camera and that meant installing a hole that was previously non-existent. I bought the airplane with a really nice paint job that has stood up well over the years and I hate to go cutting or drilling on it.
The first thing I did was to modify the unit itself. It comes with four notches in the corners to facilitate mounting. I had always planned to mount it under the left wing tip, probably attached to the tip rib somehow, but again, I didn't want to go drilling more holes if I didn't have to. I finally settled on mounting with a large Adel clamp.
I wanted to be able to mount it such that it would not be able to move, or more importantly slip out of the clamp. Since Adel clamps are designed to clamp around round things, like tubing, I toyed with the idea of making something that would make the body more round, like filler material. It was quickly shown that this was a less than optimal plan. Even with the rectangular cross section, the clamp would still grip the corners.
In order to make it more secure I notched the mounting flanges on the case. This gave a recess for the clamp to set into. Top and bottom view of the modified power supply housing can be seen below.
 |
| Top View after modification. |
 |
| Bottom view after modification. |
 |
| Housing with Adel clamp attached. |
The primary reason that I wanted to use an Adel clamp to mount it was so that I could use one of the tooling holes in the end rib as a mount point without having to install any additional holes.
I was able to find a location and orientation that kept it out of the way of everything else. I had originally planned to use the aft tooling hole in the forward tip rib, but due to the ground wires that were there it didn't fit in that location. Moving it forward wasn't an option because the power supply was too big to fit up there. Using the forward hole on the main tip rib worked out just right (Goldilocks would be proud).
 |
| The tooling hole worked out just right. |
 |
| New ring terminals, a new ground screw, and starting to clean up the loose wires with a few zip ties. |
I spliced into the power wire for the position lights so that the power supply would be energized whenever the position lights are on. This leads to one of the few draw backs to this item, namely that the position lights have to be on all the time to have power to the camera.
The camera will work off ship's power with no battery, but in order for that to work I would have to turn on the master switch and the Nav. Lights so I could turn on the camera before I got in the airplane and started it up. By leaving a battery in it I can start the camera before I get in the airplane and then transfer to ship's power when I get the engine running.
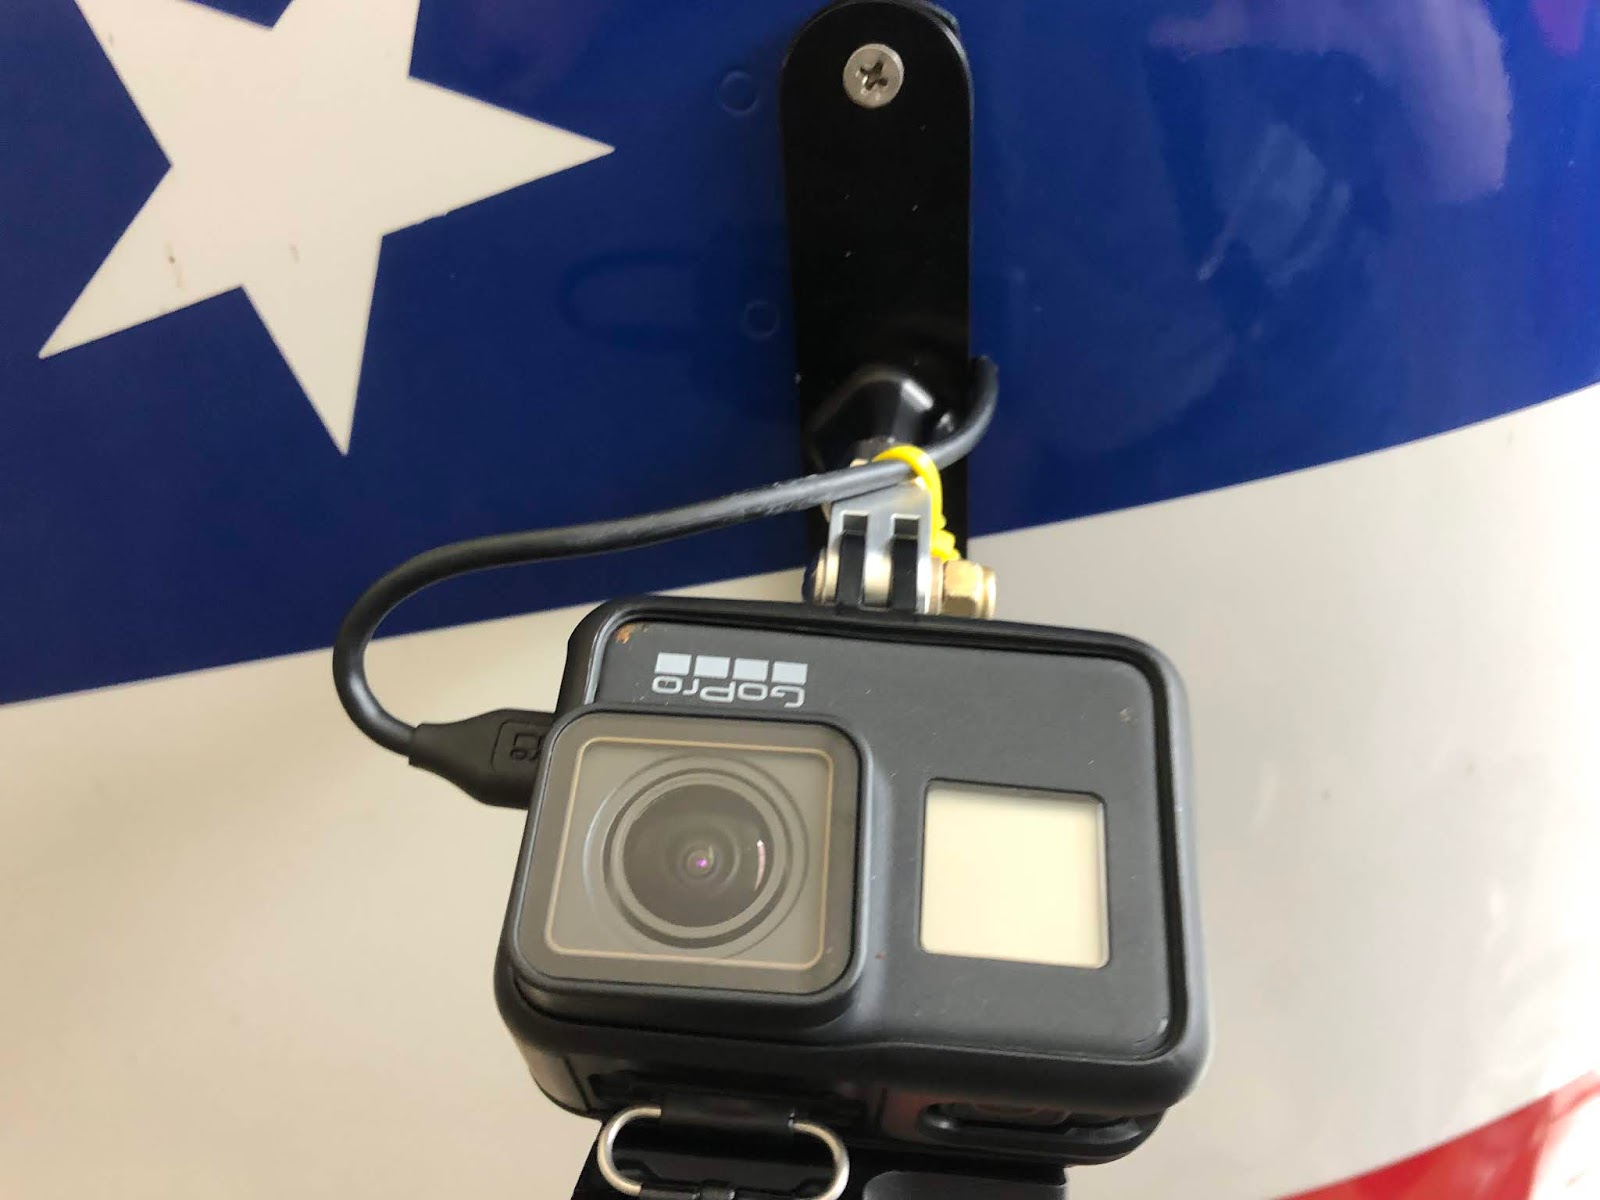
The last hurdle was to find some way to get a cable from the power supply, on the inside of the wing, to the camera, on the outside of the wing and that is the other draw back to this item. I first shaved all of the plastic off of the end of a cable hoping to make it small enough to fit through a reasonable sized hole that I could then put a grommet in. When finished, the cable end would still require a 7/16 hole to fit through, much larger than I really wanted to drill.
 |
| Even with all of the plastic removed, this would have required a 7/16 hole in the wing tip. |
I finally went back to my first idea which was to drill the smallest hole possible, just the diameter of the cable itself, and cut a notch to the end of the tip that it can be slid through.
 |
| A small slot, just big enough for the cable to slide through. |
Unfortunately, the cable that I made the slot for was the wrong cable. The camera needs a USB C cable and I made the notch for a USB B cable. Yes, I did notice this before I got the wing tip all the way back on. Now I had to scramble to find a USB C cable that was as thin as the one I cut the notch for. It made me a little nervous because the cable that came with the camera was a huge thick thing. I just happened to have a GoPro cable at home from an older camera that has a smaller diameter cable, hopefully it will be close.
I learned a few things about cables through the GoPro Forum. Apparently, it is a good thing I didn't get the narrow cable I was looking for, they evidently can cause problems. The cable that I had was indeed larger, so I had to enlarge the slot a little, but not much. It is a snug fit and there was just barely enough room to get one thickness of electrical tape around the cable where it goes through the wing tip. Hopefully this will provide at least some protection against chafing.
Before buttoning everything back together I turned it all on and let it run for 15 minutes to see if anything had any tendency to heat up. All the wiring and the power supply itself remained at room temperature. The camera gets a little warm, but it always has and is out in the air stream.
Here is the final result.


Epilogue (or Epiblog) 8/24/19
I finally got a chance to test the setup in flight today. It took a little fiddlin' with (technical term) to get the result I wanted. When I first tried it I must have done something wrong because it didn't record. The next time I tried it with the battery removed, which required turning on the battery and nav. lights before I got int he airplane so I could start the camera recording. Unfortunately, there is enough of a power interruption during engine start going from the battery to the alternator that it caused the camera to stop recording and turn off.
What I discovered is that I have to turn the camera on with the power switch (not the fast start switch) and then begin recording. From there I can turn on the power supply at any time I want. I usually wait until I am at cruise and the battery has got some of its charge back and the boost pump is off.
On today's flight I was able to record for a total of a little over 2 hours, including a lunch stop where everything got turned off and when I landed at home it was still recording and had about 1/3 of the battery life left. I think this is going to work!
Here is how that first test turned out: https://www.youtube.com/watch?v=fq8vkJMgbJs.
TTFN